BlogLines 의 TopLinks에 갑자기 GmailFS 라는 글이 1등으로 올라왔습니다.
단어도 먼가 있어보이죠 ? 어쨋거나 Gmail 단어가 이슈인지라 멀까 하고 달려가 봤더니..
허.. Gmail 의 1GB 스토리지를 리눅스에 마운트 시켜 사용하는 방법에 대한 멋진 포스팅 입니다.
리눅스 커널에 가상파일시스템을 마운팅해주는 FUSE (Filesystem in USErspace) 를 이용하구요.
Gmail 과의 통신에는 libgmail을 이용합니다.
Python 으로 되어있는 FUSE 바인딩 라이브러리 와 mount.gmailfs 라는 python 코드가 같이 배포되었네요.
하여튼.. 설치방법은 GmailFS 링크에서 참조하시면 되구요..
(흑.. 사실은 많은 난관이.. python-dev 패키지가 있어야 해서리.. python을 몽창 2.3.4로 업데잇까지 하구..
업데이트후에도 array.so 가 unicode 어쩌구 에러나서 몽창 재컴파일까지.왕삽질 -_-;)
결과화면은 이렇습니다.
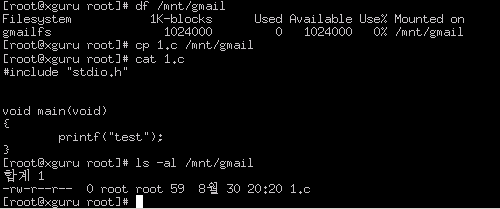
gmail 이 /mnt/gmail 에 마운트 되었습니다. 여유공간 1GB
여기다 1.c 라는 파일을 복사했습니다. 이제.. GMail 에 로그인 해보죠.
–MORE–

복사하고 나서 Gmail 에 로그인 해보면 파일하나당 요런 이상한 메시지들이 생깁니다.
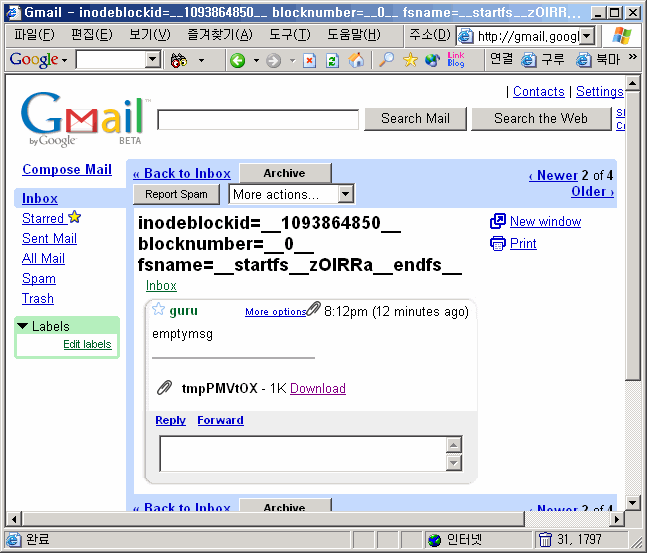
중간에 첨부파일이 있는 놈을 클릭해보면 파일이 하나 첨부되어 있는데요
얘를 다운받아서 보면~
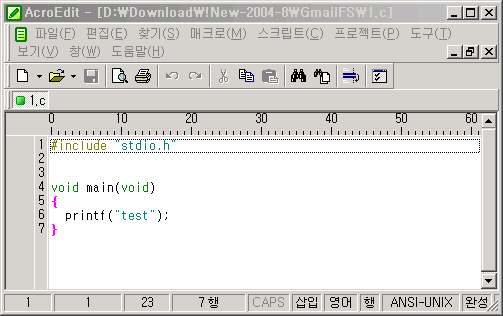
요렇게 제대로 보입니다. 하핫
아직 초기단계이지만.. 아주 재미난 시도인듯 합니다.
속도만 빠르다면 간단한 웹하드로도 쓸수 있지 않을까요 ^^
뭔지는 모르겠지만..아무튼 신가하군요..
루트 없으니 패스! ㅠㅠ
안녕하세요. Gratia입니다.
첨부파일 용량에 제한 있는 걸로 아는데 그보다 큰 파일의 경우가 궁금하네요. 용량도 문제고 전송시간도 문제가 될테니…
아무튼 멋진 시도하셨네요. 짝짝! 🙂
굉장하군요. 갑자기 GMail 신청하고 싶군요… 😀
[+BoonGSRa님] 딱 신기하기만 합니다. 성능상으론 아직 별루에요 🙂
[+hof님] 해킹하세요.. -_-b
[+Gratia님] 저야.. 머 그냥 따라쟁이 ^^;
[+인클루드님] 요즘 GMail 인비가 남발하나 보던데요. 하나 만들어 두심이..
만들어 버렸습니다… 흐흐…
이제… GMailFS 삽질을… =3=3=3
좋은정보감사합니다 퍼갈께요 ~_~
핑백: Clip for 눈love
음… 사진을 보러 클리앙에서 보고 갑니당^^ㅎㅎㅎ
[+인클루드님] 제가 삽질 많이 해뒀으니.. 조금만 하셔도 되지 않을까요 ^_^;
[+bleu님] 훔.. 스크랩해가시는건 좋지만.. 출처는 좀 남겨주셔야 하지 않을까요.. -_-+
[+Xino님] 그래서 그쪽에 여운을 남겨둔거였죠 ^_^;
음…리눅스 머신을 가진 사람만이 GmailFS를 사용할 수 있는 것인데…
그냥 머신에 웹하드 프로그램 깔아서 쓰는게 더 편할 듯 싶은데요.
뭐…재미로는 괜찮지만…제대로 된다해도 효용성에선 별로일 듯 싶어요.
핑백: 토끼군의 알 수 없는
윈도+cygwin+gmailFS 가능하겠군요.
[+ENTO™님] 음.. 지금이야 속도가 별로지만. 정식오픈되고 속도가 빨라지면.. 계정추가만으로 몇기가짜리 웹하드가 되는거죠.. 물론 공짜이구요 ^^. 혹시 공짜 웹하드가 있나요 ?
[+정승욱님] 음.. cygwin 에서 FUSE 가 돌아갈까요 ?
[+구루님] 네…리눅스에서 설치해 사용할 수 있는 무료 웹하드 프로그램이 있습니다.
다만 계정 발급 숫자가 3인으로 제한되어 있기는 하지만…
개인적인 용도로 쓰기에는 충분합니다. 계정 하나만 있어도 되니까요…^^;
http://orangedisk.co.kr/ 의 다운로드에서 배포버젼 받아서 확인해보세요.
[+ENTO™님] 오.. 이런 서비스가 있네요. 근데 전 호스팅받고 있는게 아니라서.. 패스 ^^;
헉스.. 효용성이 별로라니요… 그냥 구글에서 막지 않는다면, alt.binaries.* 나 p2p대용으로도
쓸 수 있어보이고…
Gmail ID 100개만 있어도 평생 백업되는 100GB 하드 하나가 공짜로…
사진찍은거, 100GB 라면 DVD로 구워도 25장, 잘 보관해봐야 10년, 10년에 한번은 정기적으로 구워줘야..
하드디스크에 보관한다고 해도, 최소 몇년에 한번은 하드를 갈아줘야 하고…
이건, 느리긴 하지만, 항온항습되는 IDC에 RAID5에 2중화된 구성으로 인터넷이되면 언제든지 억세스 가능한
최고의 백업디스크라는…
[+segv님] ㅎㅎ 제생각도 그렇습니다. 아마도 GMail 역시 구글에서 만든 Google File System 을 이용해서
멀티서버에 분산되어 처리되고 있을것이라 예상합니다. 내부는 매우 안정적이고 빠르겠죠. 현재는 느리지만요
Google File System http://www.cs.rochester.edu/sosp2003/papers/p125-ghemawat.pdf
오오 진짜 1000힛 넘었네? 쿠쿠쿠
솔직히 카운터라는게 쫌 그렇지만 그래도 쪼끔 기뿌지 않냐? ^^
[+AKI님] 흐.. 기분이야 좋다만 이슈거리 기사라 그런거겠지. (글과 상관없는 리플.. -_-;)
설치해봤는데,,, constants.py 에서 막혔어요. gmail.js 가 필요한것 같은데,,, 어떻게 구하는건지 알려주시면 감사하겠습니다.
[+yong27님] 엥 ? gmail.js 라는 파일은 없는데요 ? 어딘가 설치방법이 잘못된게 아닐까요 ?
마운트하고나서 ls 하니까
WARNING:root:Live Javascript and constants file versions differ.
이래길래, 소스를 좀 읽어봤더니, libgmail에서 gmail.js를 토대로 constants.py 를 만들더라고요. 워닝 무시하고 그냥 써도 돌아가긴 하더라고요
[+yong27님] 아.네 저도 처음에 마운트 할때 그 메시지는 나오더군요 🙂
핑백: Bamsaemi Blog
핑백: 익명
/usr/local/bin/gmailfs.py /path/of/mount/point gmailfs noauto,username=gmailuser, password=gmailpass, fsname=zOlRRa
여기에서 수정할게 username, password 하고 마운트 경로만 수정하면 되죠?
[+^^님] 네 설치가 제대로 되셨다면.. 그부분만 수정하시면 됩니다.
[+구루님]님 fuse-python, libgmail, gmailfs 프로그램들을 어떻게 설치 하는지 알수좀 있을까요??
프로그램은 받아서 압축까지는 풀어 놓기는 했는데 그 다음 부터 어떻게 해야 될런지…
[+^^님] 제 리눅스 시스템은 회사에 있는지라.. 지금 보면서 말씀드릴수가 없네요.
FUSE 는 안에 INSTALL 문서를 참조하셔야 할듯하구요.
libgmail 은 안에 있는 py 파일들만 python 밑에 복사하시면 됩니다.
gmailfs 는 실행가능한 경로에만 넣어두시면 됩니다.
FUSE에서 python setup.py build, python setup.py install 실행 시켜주는거 맞나요?
실행 시켜보면 command not found 메시지가 여러줄 뜨던데…
python 은 잘 설치되어 있나요 ?
python 외에는 사용하는게 없던걸로 기억하는데요.
python2.3 버전으로 설치 되어있거든여…
[+^^님] python-dev 패키지가 깔려있는지 확인해보시겠어요 ?
저도 그거때문에 python 을 싹 업그레이드 했거든요.
python2.3-dev 2.3.4-11sid 로 설치가 되어 있는데…
진짜 뭐 때문에 안되는지 알수가 없네요 ㅠ.ㅠ
[+^^님] 정확한 메시지라도 보여주시면, 알아보기가 쉬울듯 합니다 ^^
libgmail.py, constants.py 는
/usr/local/lib/python2.3/site-packages/ 이 경로에 복사
gmailfs.py 는
/usr/local/bin/ 이 경로에 복사
/etc/fstab 여기에
usr/local/bin/gmailfs.py /path/of/mount/point gmailfs noauto,username=계정아이디, password=비밀번호, fsname=zOlRRa
이렇게 해서 등록했습니다.
지금 잘 안되는 부분이…
FUSE가 잘 안되거든요….
mount -t gmailfs /usr/local/bin/gmailfs.py /path/of/mount/point -o username=계정아이디, password=비밀번호, fsname=zOlRRa
쉘에서 이렇게 실행 하면 옵션이 잘못 됐는지 도움말이 뜨네요 ㅠ.ㅠ
쉘에서 python setup.py build, python setup.py install 실행시키면 아래와 같이 나오거든요…
/usr/bin/python: line 11: js_version: command not found
/usr/bin/python: line 13: D_VERSION: command not found
/usr/bin/python: line 14: D_QUOTA: command not found
/usr/bin/python: line 15: D_DEFAULTSEARCH_SUMMARY: command not found
/usr/bin/python: line 16: D_THREADLIST_SUMMARY: command not found
/usr/bin/python: line 17: D_THREADLIST_END: command not found
/usr/bin/python: line 18: D_THREAD: command not found
이하생략!!
그 값들은 constants.py 에 들어있는 값인데요
아마도 python 의 경로가 틀린듯 합니다만..
python 경로가 /usr/bin/python 인걸로 봐서는
/usr/lib/python2.3/site-packages/ 에 넣으셔야 할것 같습니다.
그럼 어떤걸 수정 해야 하나요??
constants.py 랑 libgmail.py 를 /usr/lib/python2.3/site-packages/ 에 한번 옮겨 보심이..
안되네요 ㅠ.ㅠ
설마해서
python2.3 setup.py install 이렇게도 해봤는데
command not found는 여전히 뜨네요…
훔.. 제가 보기엔.. python이 constants.py 랑 libgmail.py 를 찾지 못하는거 같은데요..
그 파일을 현재디렉토리로 옮겨도 그런가요 ?
어쨋거나 그놈들을 python 이 찾을수 있도록 제대로된 위치에 찾아 넣어줘야 할듯 합니다만.
네 알겠습니다
만들어 보면 재미있겠당… 굳이 탐색기에 떠야 하는 것은 아니잖아요… 전용 프로그램으로 볼수만 있어도 되니… 뭐 손해보는 것은 아니니까능. ㅎㅎㅎ
모든 리눅스 시스템에서 가능 하나요?
레드햇에서 해볼려구 하는데….
[+blue님] 리눅스라면 다 될거 같은데요. 전 KoreLinux 배포판에서 해봤습니다. Kore 가 레드햇 기반 이니.. 아마도 될듯 합니다.
fuse-1.3.tar.gz 이 파일도 필요하나요??
[+blue님] 네 기본적으로 설치 되어야 합니다.
겨우 python2.3 setup.py install 안된 원인을 찾아 냈습니다.^^
Installing GmailFS 이부분은 똑같이 설정 했구요
Using GmailFS 부분에서
/usr/local/bin/gmailfs.py /gmail(예) gmailfs noauto,username=abcd(예), password=1234(예), fsname=zOlRRa
이렇게 /etc/fstab에 추가 했습니다.
그런데 mount -t gmailfs /usr/local/bin/gmailfs.py /gmail(예) gmailfs noauto,username=abcd(예), password=1234(예), fsname=zOlRRa 이렇게 실행하면
실행이 안되고 help가 뜨는데 뭐 때문에 그러는지…
[+^^님] 정확한 에러메시지가.. -_-?
Usage: mount -V : print version
mount -h : print this help
mount : list mounted filesystems
mount -l : idem, including volume labels
So far the informational part. Next the mounting.
The command is `mount [-t fstype] something somewhere’.
Details found in /etc/fstab may be omitted.
mount -a [-t|-O] … : mount all stuff from /etc/fstab
mount device : mount device at the known place
mount directory : mount known device here
mount -t type dev dir : ordinary mount command
Note that one does not really mount a device, one mounts
a filesystem (of the given type) found on the device.
One can also mount an already visible directory tree elsewhere:
mount –bind olddir newdir
or move a subtree:
mount –move olddir newdir
A device can be given by name, say /dev/hda1 or /dev/cdrom,
or by label, using -L label or by uuid, using -U uuid .
Other options: [-nfFrsvw] [-o options] [-p passwdfd].
For many more details, say man 8 mount .
[+^^님] noauto 다음에는 빈칸이 하나도 오면 안됩니다.
콤마 사이에 빈칸을 다 지워주세요. ^^
이제 실행은 되는데
실행후 다음과 같은 메시지가 뜨네요 ㅡㅡ
FATAL: Module fuse not found.
fusermount: unable to open fuse device /proc/fs/fuse/dev: No such file or directory
[+^^님] fuse 설치가 제대로 안된것 같은데용 ^^;
Basic Installation 이부분만해 주면 되나요?
[+^^님] 예.. 저도 그걸 따라 한것 같은데요.
1번은 했는데 2번 부터어떻게 하라는건지…
make???
2번부터 좀 설명좀 해주시면 안될까요?
[+^^님] 일반적인 설치처럼 ./configure 하신후 문제없이 종료가 되었다면,
make 하신후 에러체크하시고, 끝까지 문제없이 빌드되었다면
make install 까지 진행하면 되는건데요.
3,5번은 무시하셔도 됩니다.
뭐를 make해야 하나요??
그냥 쉘상태에서 make하면
make: *** 타겟이 지정되지 않았고 메이크파일이 없습니다. 멈춤.
make install은
make: *** 타겟 `install’를 만들 규칙이 없음. 멈춤.
이렇게 이렇게 나오고 아무것도 안되던데요…
[+^^님] ./configure 가 에러없이 종료된거 맞나요 ?
에러가 나서 Makefile 이 제대로 생성 안된것 같은데요
checking for a BSD-compatible install… /usr/bin/install -c
checking whether build environment is sane… yes
checking for gawk… no
checking for mawk… mawk
checking whether make sets $(MAKE)… yes
checking for gcc… gcc
checking for C compiler default output file name… a.out
checking whether the C compiler works… yes
checking whether we are cross compiling… no
checking for suffix of executables…
checking for suffix of object files… o
checking whether we are using the GNU C compiler… yes
checking whether gcc accepts -g… yes
checking for gcc option to accept ANSI C… none needed
checking for style of include used by make… GNU
checking dependency style of gcc… gcc3
checking for ranlib… ranlib
checking kernel source directory… Not found
configure: error:
*** Please specify the location of the kernel source with
*** the ‘–with-kernel=SRCDIR’ option
마지막에 에러가 하나 나오긴 했는데….
[+^^님] 네.. 커널소스 디렉을 못찾아서 그렇네요
강제로 –with-kernel= 인자에 소스디렉토리를 지정하셔야 할듯
어떻게 지정해줘야 하는데요??
[+^^님] ./configure –with-kernel=/usr/src/kernel 이런식으로요
먼저 님 커널소스가 어디있는지를 찾으셔서 위에 /usr/src/kernel 부분에 바꿔주세요
경로를 지정해서 실행하고 나니 오류는 발생 안하네요…
make를 실행하니깐 뭐가 쭉~ 뜨구여
make도 실행하니깐 마찬가지로 쭉~ 뜨네여…
그런데 마운트를 시키면
FATAL: Module fuse not found.
fusermount: unable to open fuse device /proc/fs/fuse/dev: No such file or directory
가 또 발생하네여 ㅠ.ㅠ
이거 하나 하는데 왜이렇게 힘든지…
[+^^님] make 의 메시지를 잘 보셔야 할듯..
fuse 가 제대로 설치안되면 수 없습니다 ^^;
make실행했을때
Making all in include
make[1]: Entering directory `/root/fuse-1.3/include’
make all-recursive
make[2]: Entering directory `/root/fuse-1.3/include’
Making all in linux
make[3]: Entering directory `/root/fuse-1.3/include/linux’
make[3]: `all’를 위해 할 일이 없습니다
make[3]: Leaving directory `/root/fuse-1.3/include/linux’
make[3]: Entering directory `/root/fuse-1.3/include’
make[3]: Leaving directory `/root/fuse-1.3/include’
make[2]: Leaving directory `/root/fuse-1.3/include’
make[1]: Leaving directory `/root/fuse-1.3/include’
Making all in patch
make[1]: Entering directory `/root/fuse-1.3/patch’
make[1]: `all’를 위해 할 일이 없습니다
make[1]: Leaving directory `/root/fuse-1.3/patch’
Making all in kernel
make[1]: Entering directory `/root/fuse-1.3/kernel’
make[1]: `all’를 위해 할 일이 없습니다
make[1]: Leaving directory `/root/fuse-1.3/kernel’
Making all in lib
make[1]: Entering directory `/root/fuse-1.3/lib’
make[1]: `all’를 위해 할 일이 없습니다
make[1]: Leaving directory `/root/fuse-1.3/lib’
Making all in util
make[1]: Entering directory `/root/fuse-1.3/util’
make[1]: `all’를 위해 할 일이 없습니다
make[1]: Leaving directory `/root/fuse-1.3/util’
Making all in example
make[1]: Entering directory `/root/fuse-1.3/example’
make[1]: `all’를 위해 할 일이 없습니다
make[1]: Leaving directory `/root/fuse-1.3/example’
make[1]: Entering directory `/root/fuse-1.3′
make[1]: `all-am’를 위해 할 일이 없습니다
make[1]: Leaving directory `/root/fuse-1.3′
이렇게 나오구여
make install했을때
Making install in include
make[1]: Entering directory `/root/fuse-1.3/include’
Making install in linux
make[2]: Entering directory `/root/fuse-1.3/include/linux’
make[3]: Entering directory `/root/fuse-1.3/include/linux’
make[3]: `install-exec-am’를 위해 할 일이 없습니다
make[3]: `install-data-am’를 위해 할 일이 없습니다
make[3]: Leaving directory `/root/fuse-1.3/include/linux’
make[2]: Leaving directory `/root/fuse-1.3/include/linux’
make[2]: Entering directory `/root/fuse-1.3/include’
make[3]: Entering directory `/root/fuse-1.3/include’
make[3]: `install-exec-am’를 위해 할 일이 없습니다
/bin/sh ../mkinstalldirs /usr/local/include
/usr/bin/install -c -m 644 fuse.h /usr/local/include/fuse.h
make[3]: Leaving directory `/root/fuse-1.3/include’
make[2]: Leaving directory `/root/fuse-1.3/include’
make[1]: Leaving directory `/root/fuse-1.3/include’
Making install in patch
make[1]: Entering directory `/root/fuse-1.3/patch’
make[2]: Entering directory `/root/fuse-1.3/patch’
make[2]: `install-exec-am’를 위해 할 일이 없습니다
make[2]: `install-data-am’를 위해 할 일이 없습니다
make[2]: Leaving directory `/root/fuse-1.3/patch’
make[1]: Leaving directory `/root/fuse-1.3/patch’
Making install in kernel
make[1]: Entering directory `/root/fuse-1.3/kernel’
/usr/bin/install -c -m 644 fuse.o /lib/modules/2.4.26/kernel/fs/fuse/fuse.o
/sbin/depmod -a
make[1]: Leaving directory `/root/fuse-1.3/kernel’
Making install in lib
make[1]: Entering directory `/root/fuse-1.3/lib’
make[2]: Entering directory `/root/fuse-1.3/lib’
/bin/sh ../mkinstalldirs /usr/local/lib
/usr/bin/install -c -m 644 libfuse.a /usr/local/lib/libfuse.a
ranlib /usr/local/lib/libfuse.a
make[2]: `install-data-am’를 위해 할 일이 없습니다
make[2]: Leaving directory `/root/fuse-1.3/lib’
make[1]: Leaving directory `/root/fuse-1.3/lib’
Making install in util
make[1]: Entering directory `/root/fuse-1.3/util’
make[2]: Entering directory `/root/fuse-1.3/util’
/bin/sh ../mkinstalldirs /usr/local/bin
/usr/bin/install -c fusermount /usr/local/bin/fusermount
make install-exec-hook
make[3]: Entering directory `/root/fuse-1.3/util’
chown root /usr/local/bin/fusermount
chmod u+s /usr/local/bin/fusermount
make[3]: Leaving directory `/root/fuse-1.3/util’
make[2]: `install-data-am’를 위해 할 일이 없습니다
make[2]: Leaving directory `/root/fuse-1.3/util’
make[1]: Leaving directory `/root/fuse-1.3/util’
Making install in example
make[1]: Entering directory `/root/fuse-1.3/example’
make[2]: Entering directory `/root/fuse-1.3/example’
make[2]: `install-exec-am’를 위해 할 일이 없습니다
make[2]: `install-data-am’를 위해 할 일이 없습니다
make[2]: Leaving directory `/root/fuse-1.3/example’
make[1]: Leaving directory `/root/fuse-1.3/example’
make[1]: Entering directory `/root/fuse-1.3′
make[2]: Entering directory `/root/fuse-1.3′
make[2]: `install-exec-am’를 위해 할 일이 없습니다
make[2]: `install-data-am’를 위해 할 일이 없습니다
make[2]: Leaving directory `/root/fuse-1.3′
make[1]: Leaving directory `/root/fuse-1.3′
[+^^님] 훔.. 메시지만 봐서는 문제가 없어 보이는데요..
/proc/fs/fuse/dev 이 디렉토리가 없던데…
혹시 fuse설치하면 같이 생겨야 되는 디렉토리 하닌가요?
[+^^님] modprobe fuse 하신다음 해보시겠어요 ?
modprobe fuse 하면 module fuse not found 라고 나오는데요 이건 어떻게 해야 하나요??? 모듈이 업는건지 아니면 안올라가는것인지 알수가 업네요. 가르쳐 주세요
[+^^님] 훔.. 점점 알수없는 상황으로 흘러가는군요 -_-;
FUSE 모듈을 못찾는다면 커널에 제대로 설치가 안된건데.. 이해가 안되네요. 쩝.
그럼 fuse설치를 다시 해야 하나요??
./configure –with-kernel=/usr/src/kernel ☜ 이부분여
[+^^님] configure/make는 잘된거 같은데.. fuse 가 안되는건 이해가 잘안되네요. fuse 관련 forum 에도 내용이 별로 없네요.
핑백: Bamsaemi Blog
핑백: 허접 개발자 비텐펠트
우선 저의 환경은 데비안 사지 그놈 2.6, 커널 2.6.9를 사용하고 있습니다
GmailFS라는걸 우연히 접하게 되었는데요 설치를 제대로 했다고 생각하는데 이상하게 안되네요…
우선 설치 순서부터 쭉 적어보겠습니다
1. apt-get install gmailfs
2. apt-get install python2.3-dev
3. fuse-1.3.tar.gz 다운받아 압축풀고 ./configure;make;make install
4. fuse-python.tar.gz 다운받아서 압축을 푼후에 터미널에서 # python setup.py build 해준후 # python setup.py install 해줬음
5. libgmail.py 와 constants.py 를 다운받은후 /usr/local/lib/python2.3/site-packages/ 디렉토리에 두파일을 복사..
6. gmailfs-0.3.tar.gz파일을 다운받은후 압축풀고 gmailfs.py 이파일을 /usr/local/bin 여기에 복사 그리고 mount.gmailfs 이파일은 /sbin 여기에 복사..
7. mkdir /mnt/gmailfs
8. /etc/fstab 여기에
/usr/local/bin/gmailfs.py /mnt/gmailfs gmailfs noauto,username=내계정, password=내비번, fsname=zOlRRa 을 추가..
9. 리부팅
이렇게 하고 확인했는데 마운트가 안되어있더군요…
그래서 직접 마운트를 해보았습니다 이렇게…
mount -t gmailfs /usr/local/bin/gmailfs.py /mnt/gmailfs -o username=내계정, password=내비번, fsname=zOlRRa
Usage: mount -V : print version
mount -h : print this help
mount : list mounted filesystems
mount -l : idem, including volume labels
So far the informational part. Next the mounting.
The command is `mount [-t fstype] something somewhere’.
Details found in /etc/fstab may be omitted.
mount -a [-t|-O] … : mount all stuff from /etc/fstab
mount device : mount device at the known place
mount directory : mount known device here
mount -t type dev dir : ordinary mount command
Note that one does not really mount a device, one mounts
a filesystem (of the given type) found on the device.
One can also mount an already visible directory tree elsewhere:
mount –bind olddir newdir
or move a subtree:
mount –move olddir newdir
A device can be given by name, say /dev/hda1 or /dev/cdrom,
or by label, using -L label or by uuid, using -U uuid .
Other options: [-nfFrsvw] [-o options] [-p passwdfd].
For many more details, say man 8 mount .
debian:/home/ekdlwk#
이렇게 나오네요…
뭐가 빠지거나 잘못되어있는게 있나요???
마지막에 mount 하실때 [ username=내계정, password=내비번, fsname=zOlRRa ] 안에서 콤마 사이에 빈칸이 있으면 안되거든요 ? 콤마를 지워주세요.
구루님 감사드립니다 콤마사이에빈칸을 지우니까 마운트는 잘되네요…그런데 /etc/fstab 여기에
/usr/local/bin/gmailfs.py /mnt/gmailfs gmailfs noauto,username=내계정,password=내비번,fsname=zOlRRa
여기도 콤마사이에 빈칸을 지웠는데 부팅하고나면
마운트가 안되어있네요 혹시 여기서도뭐가 잘못되어있나요?
fstab 수정하는것은 저도 잘 안되더라구요. 그래서 그건 포기했습니다 🙂
구루님 지금 보니까 root로 로그인했을때는 마운트가 되어있네요 그런데 리부팅하고 일반계정으로 로그인하면 마운트가 안되어있구요…gmailfs는 오직루투로만 마운트가능한가요? 일반계정에서도 마운트 할수있는 방법이있을까요?
아 지금 찾아보니 fstab 에 추가한 라인에 noauto,user를 주면 일반계정에서도 마운트 가능할거 같은데요 ?
Gmail이라 ..
아주 신비감을 가져다주는존제네요 ..
써보고 싶은데 혹시 .. 초대장 가지신분 있으신가요
First Name: namsa
Last Name: park
E-mail: me1024@empal.com
보내드렸습니다 🙂
gmail정말 인기 많군요. 말도 많고 탈도많은 지멜 저도 써보면 않될까요
First Name: joonyoung
Last Name: oh
E-mail: ojy0412@empal.com
보내드렸습니다~
gmail
지멜 저도 써보면 않될까요
First Name: jinsoo
Last Name: choi
E-mail: abrahamchoi@hotmail.com
보내드렸습니다~
아직도 오질않았습니다.
다시 송부를 부탁드립니다.
오늘도 즐거운 하루되시기 바랍니다.
그럼….
음.. 이상하네요.. 그냥 다시한번 보냈습니다 ^^
혹시 스펨통에 들어가있는지도 확인부탁드려요~
클릭 세번으로 Gmail 계정 만들기
http://offree.net/index.php?pl=278
이제 이곳에서 편하게 만들어요